
【Proxys.io】Proxy Configuration
A DuoPlus cloud phone needs its own network identity: a separate IP for every device, matching the region you want to work in. This guide shows how to buy a proxy at Proxys.io, where to find its connection details, and how to bind it to a cloud phone in DuoPlus.
1. About Proxys.io
Proxys.io is a proxy provider that has been on the market since 2016. It offers all the main proxy types in one dashboard:
- Mobile proxies - addresses of real mobile carriers, the highest trust level for social apps;
- Residential proxies - home ISP addresses, billed per traffic, with a rotation interval you set yourself;
- ISP and premium IPv4 - static residential addresses tied to one user;
- Individual and shared IPv4 - datacenter addresses, the most common static option;
- IPv6 - the lowest price per IP, but many platforms still do not support it.
All types work over both HTTP(S) and SOCKS5, proxies are issued automatically right after payment, and support is available 24/7. If a proxy turns out to be unsuitable, you can request a refund within 24 hours of purchase.
2. Get a Proxys.io proxy
2.1 Choose the right proxy type
Choose the type based on what the cloud phone will be used for. Mobile proxies are the option for accounts that need a high trust level. ISP and premium IPv4 suit long-term work from one stable address. An individual IPv4 is enough for everyday browsing, region checks and light automation. Residential proxies billed by traffic are better for high-volume requests and parsing.
Two rules matter more than the price. First, the proxy country must match the region you are going to work in: a cloud phone takes its network identity from the proxy, so the IP's country is the country apps will see. Second, one proxy belongs to one cloud phone: a shared address links your accounts together.
2.2 Register and buy
- Open Proxys.io and create an account, or sign in to an existing one.
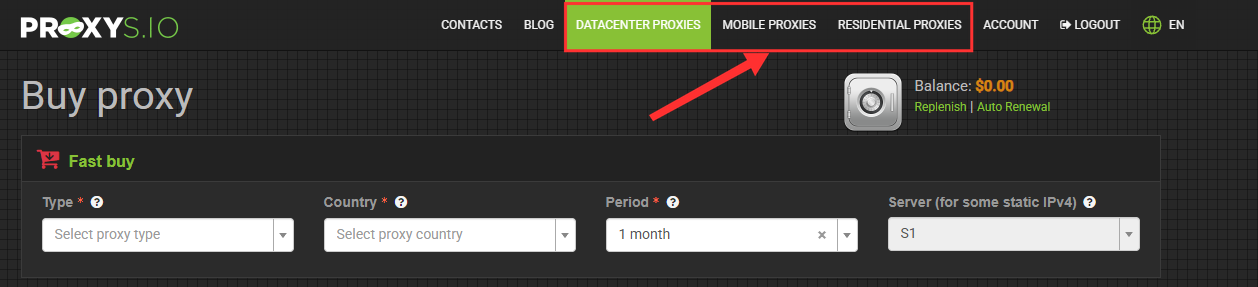
- Choose the section for the type you need: datacenter, mobile or residential proxies.
- Set the parameters: country, rental period and quantity. For residential proxies billed by traffic, set the volume in gigabytes instead.
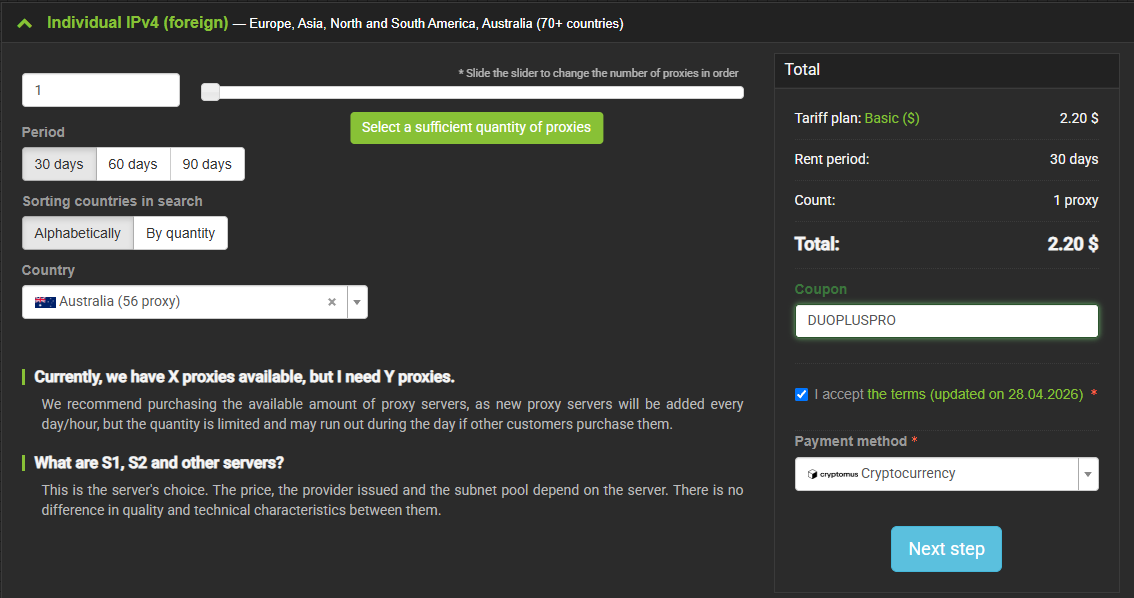
- Enter your e-mail and, in the promo code field, one of the codes for DuoPlus users: DUOPLUSPRO takes 10% off all static plans, DUOBOOST - 35% off residential proxies billed by traffic.
- Pick one of the payment methods offered on the page and pay for the order. Proxies are activated automatically and appear in your dashboard immediately.
A promo code is only applied before payment and cannot be added to an order that has already been paid. The Coupon Code field in the DuoPlus order panel is a separate thing and does not accept these codes.
2.3 Get your proxy details
Open your Proxys.io dashboard and find the proxy you just bought. Each static proxy is issued with:
- IP address (for residential proxies - a domain instead of an IP);
- port for HTTP(S) and a separate port for SOCKS5;
- login;
- password.
Copy the IP (or domain), the SOCKS5 port, the login and the password - these four values are what DuoPlus asks for. You do not need to choose a protocol at purchase: both ports work on the same proxy, and the protocol is determined by which port you use.
Rotating proxies are issued a little differently. For residential proxies you first create a list in the dashboard: pick the country, set the rotation interval, and get a domain with a port instead of an IP address, along with its own login and password. DuoPlus takes these values in the same fields. The interval cannot be switched off, so set it to the maximum - a cloud phone works better when the address stays the same for as long as possible.
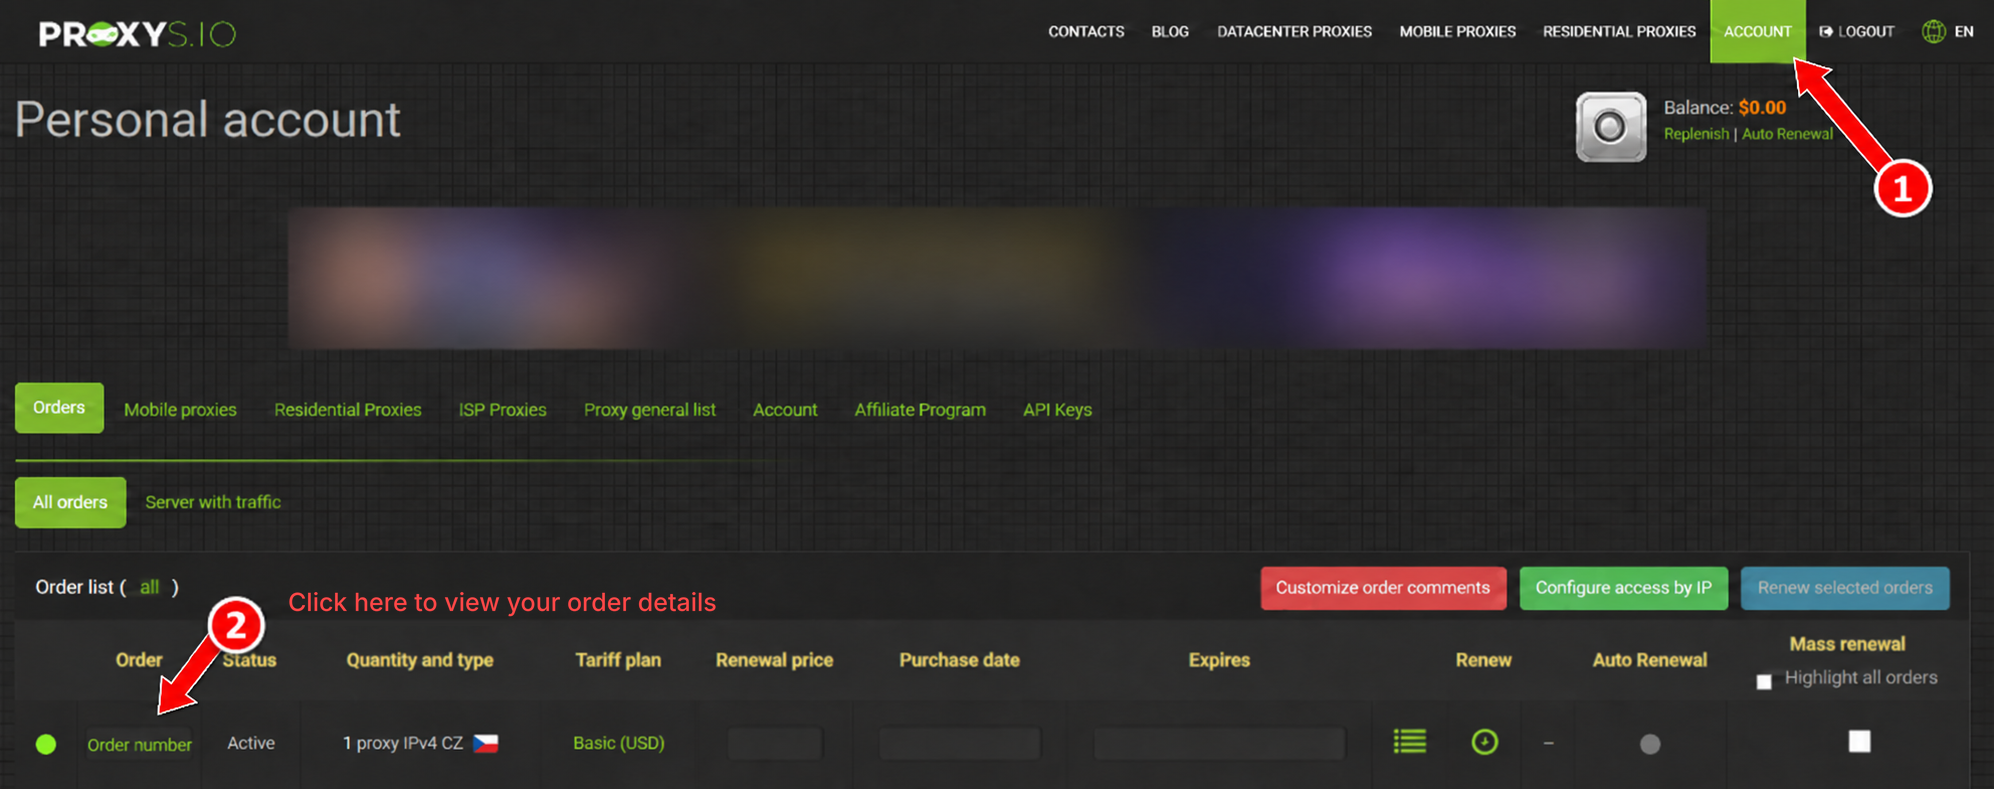
Tip: If your software authorizes by IP instead of a password, you can bind the proxy to your own address in the dashboard. For DuoPlus, keep login-and-password authorization.
3. Configure the proxy in DuoPlus
3.1 Register and log in to DuoPlus
Go to duoplus.net, create an account and sign in.
3.2 Create a cloud phone
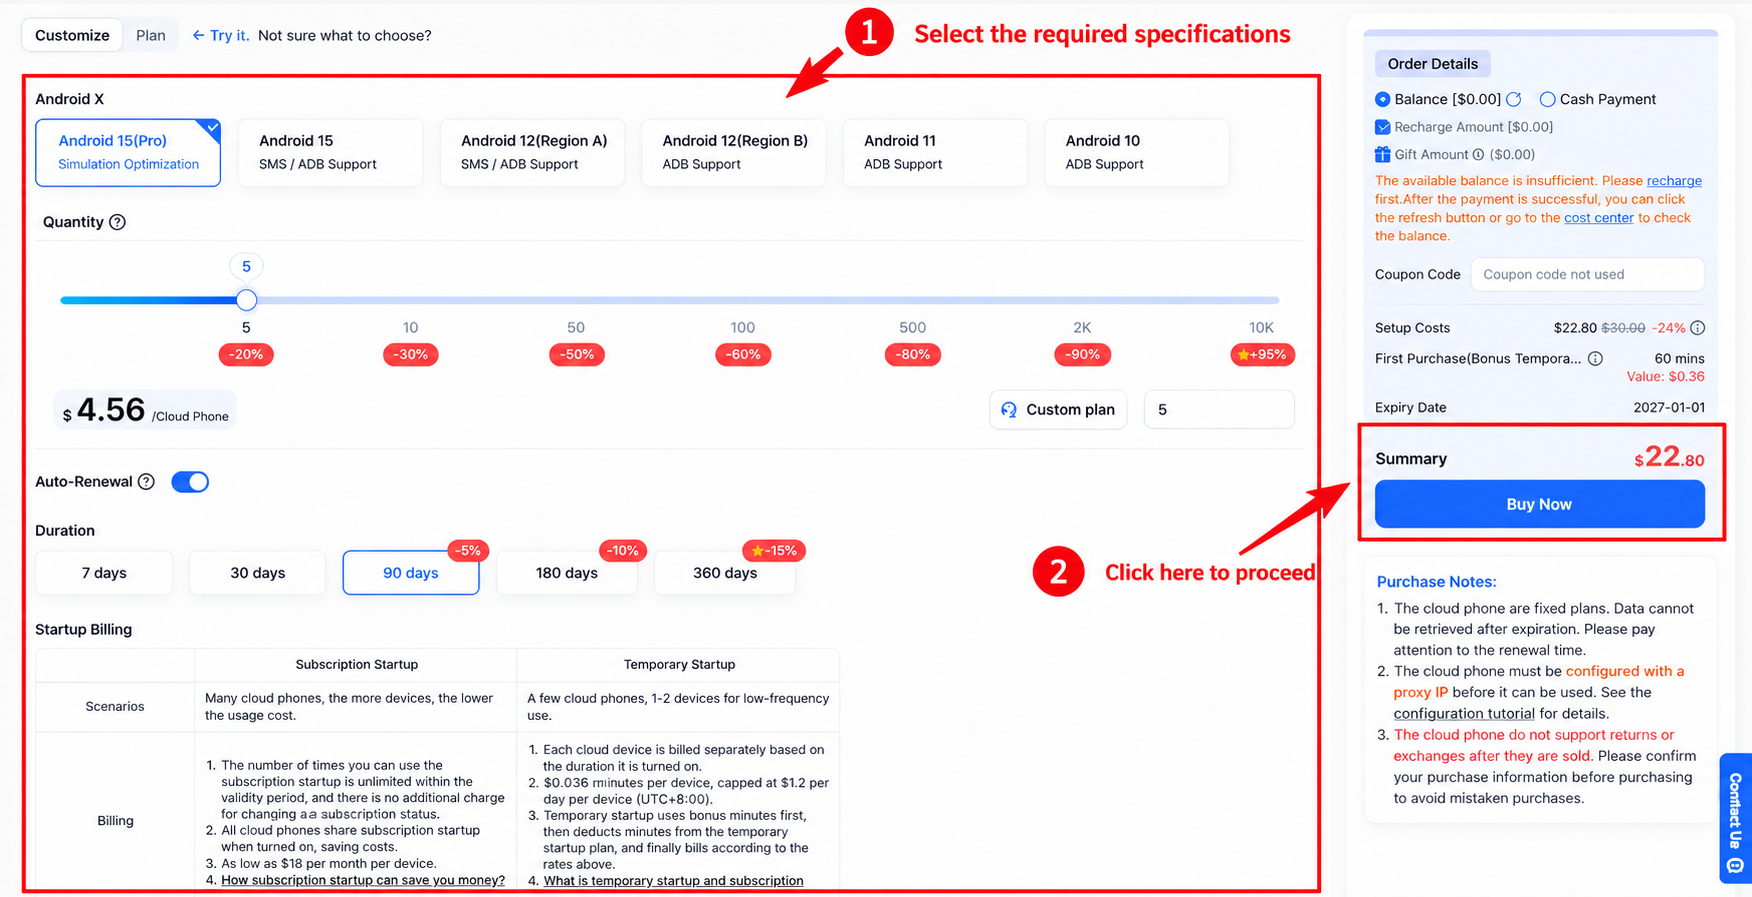
- Click Buy Cloud Phone in the top right corner, or Try Now in the cloud phone list.
- On the Customize tab choose the Android version. Each card shows what the build supports, from SMS and ADB to simulation optimization.
- Set the quantity. The scale above the price shows the volume discount, which starts from five devices.
- Turn auto-renewal on or off, then choose the duration: 7, 30, 90, 180 or 360 days, with a discount on the longer periods. Under the duration the page compares the two startup billing models, subscription and temporary, so you can see how the device is charged while it is running.
- In the Order Details panel pick how to pay: from your balance, which has no transaction fee, or by cash payment through WeChat, Alipay or PayPal. If the balance is not enough, top it up and refresh the panel.
- Check the total and click Buy Now. After payment DuoPlus opens the proxy configuration page - a cloud phone cannot be used until a proxy is attached to it.
3.3 Add Custom Proxy
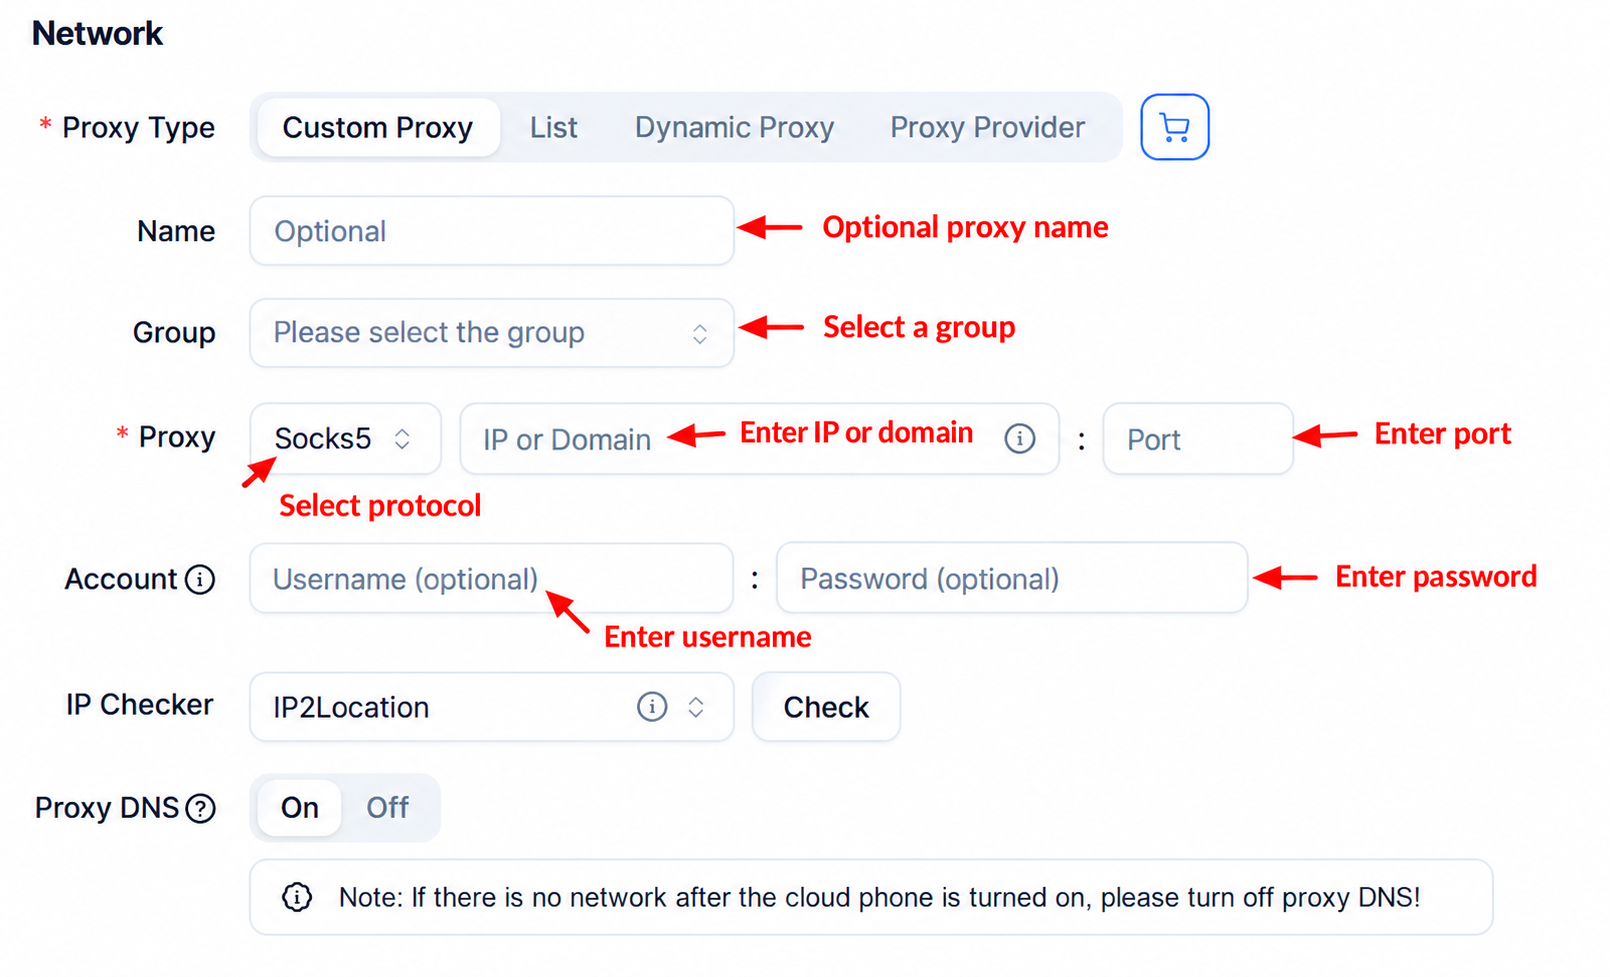
On the proxy configuration page, click Add Custom Proxy and fill in the form with the values from section 2.3:
- Proxy type - SOCKS5;
- Host - the IP address or domain from Proxys.io;
- Port - the SOCKS5 port;
- Username - the proxy login;
- Password - the proxy password.
You can also paste the whole connection string into the IP or Domain field: DuoPlus splits it into the host, port, login and password itself. Check the result against your dashboard before moving on.
3.4 Check the proxy
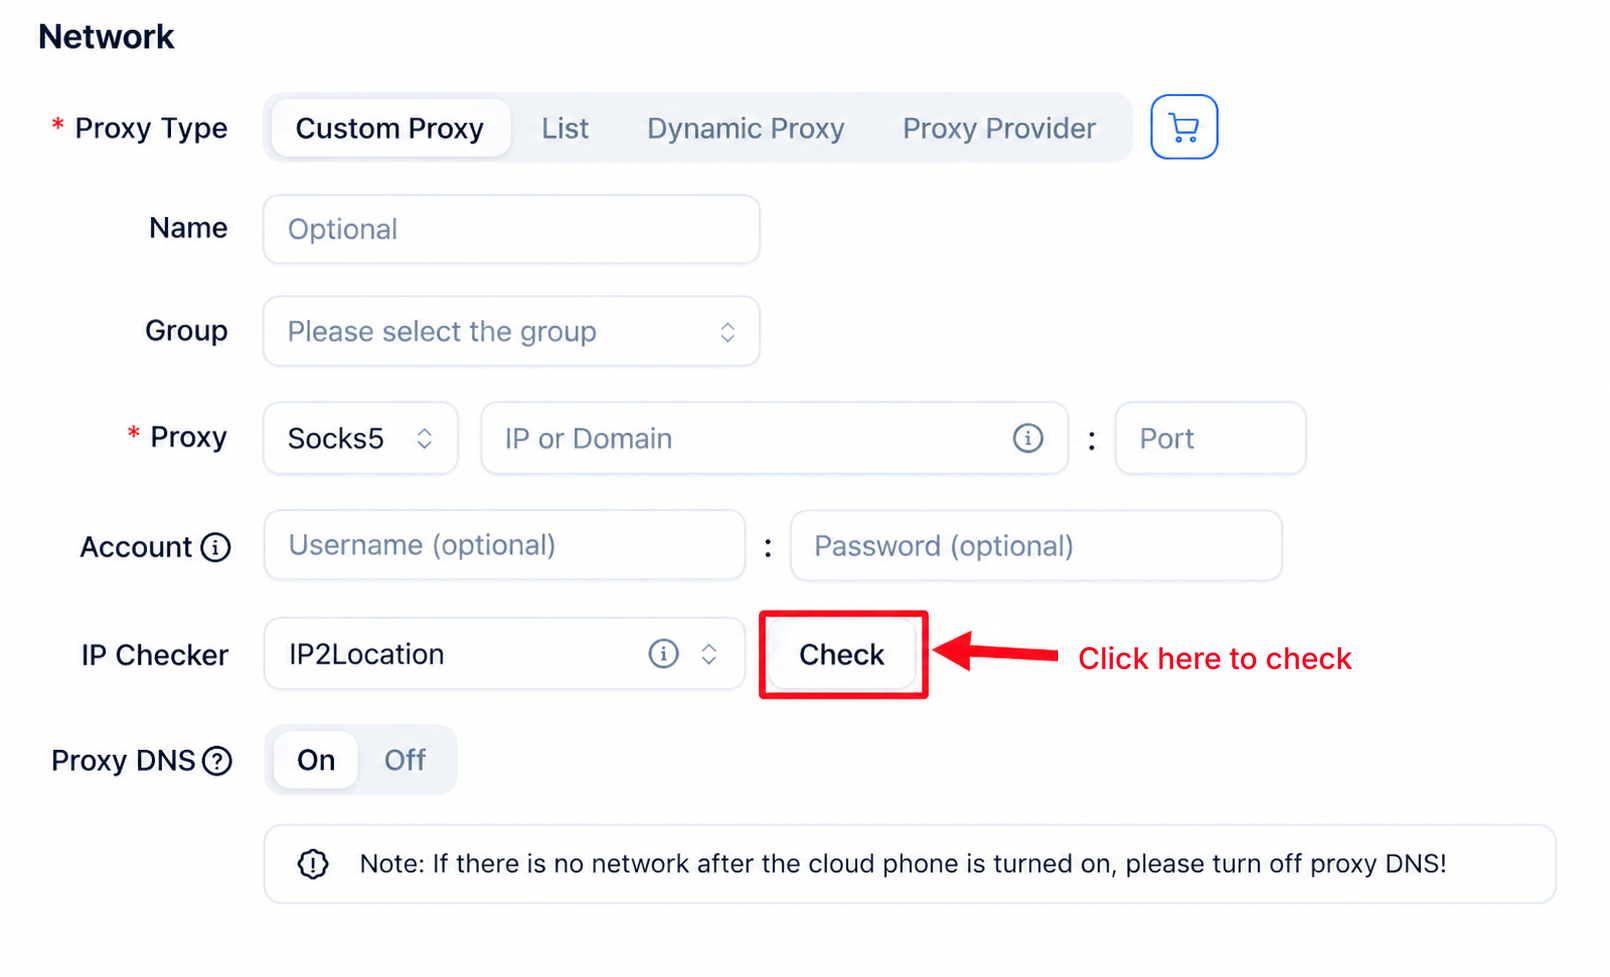
Click Check Proxy. A successful check returns the exit IP and its location - make sure the country matches the proxy you bought. Then click Complete Configuration in the bottom right corner: this finishes the setup and creates the device.
If the check fails, the usual causes are the wrong port - DuoPlus needs the SOCKS5 one, not the HTTP(S) one - stray spaces in the login or password, or IP authorization left switched on in the Proxys.io dashboard. For a residential proxy, check the country of the list you created and set its rotation interval to the maximum: a cloud phone needs a stable address. If the proxy still does not work, contact Proxys.io support - it answers 24/7 and replaces non-working addresses.
4. Start the cloud phone
The new device appears in your cloud phone list - click Connect and wait a few seconds for the startup to finish.
The cloud phone opens with the Proxys.io IP already applied, so apps inside it see the country of your proxy.
Right after the first launch, check the result from inside the device: open any IP checking service in the cloud phone's browser and compare the address and the country with the proxy you bought. If the country is different, return to the proxy configuration and check the host, the port and the protocol again.
From here you can work as usual: adjust image quality, upload files, change device parameters and run batch operations across several devices.
5. Summary
Connecting a proxy to a cloud phone comes down to four values and two checks. Buy a SOCKS5 proxy at Proxys.io in the country you are going to work in, copy the IP or domain, the SOCKS5 port, the login and the password, pass them to Add Custom Proxy, and run Check Proxy before clicking Complete Configuration. Once the device starts, confirm the country from inside it.
Two habits keep the setup stable over time: one proxy per cloud phone, and either a static address or the maximum rotation interval for a residential one. If a proxy stops working, Proxys.io support answers around the clock and replaces addresses that have gone down.
DuoPlus users also have two codes at Proxys.io: DUOPLUSPRO for 10% off all static plans and DUOBOOST for 35% off residential proxies billed by traffic.
;}.cls-2{fill:%230868f7;}.cls-3{fill:url(%23未命名的渐变_44);}.cls-4{fill:%23333;}%3c/style%3e%3clinearGradient%20id='未命名的渐变_8'%20x1='33.73'%20y1='100.61'%20x2='-0.03'%20y2='-1.06'%20gradientUnits='userSpaceOnUse'%3e%3cstop%20offset='0'%20stop-color='%237ae9fb'/%3e%3cstop%20offset='0.67'%20stop-color='%232b90f8'/%3e%3cstop%20offset='1'%20stop-color='%230868f7'/%3e%3c/linearGradient%3e%3clinearGradient%20id='未命名的渐变_44'%20x1='27.86'%20y1='18.67'%20x2='68.36'%20y2='22.22'%20gradientUnits='userSpaceOnUse'%3e%3cstop%20offset='0'%20stop-color='%235ac7f2'/%3e%3cstop%20offset='1'%20stop-color='%230868f7'/%3e%3c/linearGradient%3e%3c/defs%3e%3cpath%20class='cls-1'%20d='M29,28.74V81.91l-9.51-3.68v0L8.52,74A7.17,7.17,0,0,1,4,67.32V24.54A3.76,3.76,0,0,1,9.08,21Z'/%3e%3cpath%20class='cls-2'%20d='M68.09,78.07a13.15,13.15,0,0,1-17.9,12.06L29,81.91h0V28.74L50.19,37A13.17,13.17,0,0,0,68.08,25.3h0Z'/%3e%3cpath%20class='cls-3'%20d='M68.08,25.3a13.19,13.19,0,0,1-6.73,10.87A13.09,13.09,0,0,1,50.19,37L29,28.74V6A3.76,3.76,0,0,1,34.1,2.52l25.59,9.91A13.22,13.22,0,0,1,68.08,25.3Z'/%3e%3cpath%20class='cls-4'%20d='M129.06,81.76a4.33,4.33,0,0,1-3.19-1.31,4.4,4.4,0,0,1-1.31-3.24V56.86H97.65V77.21a4.36,4.36,0,0,1-1.35,3.2A4.68,4.68,0,0,1,93,81.76a4.32,4.32,0,0,1-3.19-1.31,4.37,4.37,0,0,1-1.32-3.24V27.27A4.58,4.58,0,0,1,89.83,24a4.59,4.59,0,0,1,7.82,3.27V48.15h26.91V27.27A4.58,4.58,0,0,1,125.91,24a4.59,4.59,0,0,1,7.82,3.27V77.21a4.37,4.37,0,0,1-1.36,3.2A4.65,4.65,0,0,1,129.06,81.76Z'/%3e%3cpath%20class='cls-4'%20d='M163.77,81.66c-6.57,0-11.76-1.92-15.44-5.7s-5.54-9.07-5.54-15.74a26.76,26.76,0,0,1,2.09-10.43,17.72,17.72,0,0,1,6.67-8.06,19.15,19.15,0,0,1,10.68-2.95,19,19,0,0,1,10.46,2.8,18.7,18.7,0,0,1,6.55,7.36,22.53,22.53,0,0,1,2.36,10.28A4.51,4.51,0,0,1,177,63.77H152.23a10.8,10.8,0,0,0,3.49,6.65c2,1.68,4.88,2.52,8.66,2.52a22.25,22.25,0,0,0,7.54-1.21c.74-.3,1.55-.67,2.37-1.07a3.75,3.75,0,0,1,1.84-.4,4.09,4.09,0,0,1,3,1.15,4,4,0,0,1,1.12,3,4.38,4.38,0,0,1-2.58,3.82,32.34,32.34,0,0,1-6.36,2.61A28.67,28.67,0,0,1,163.77,81.66ZM172.4,55.9a9.72,9.72,0,0,0-1.63-4.56A9.9,9.9,0,0,0,167,48a10.38,10.38,0,0,0-4.64-1.14,12,12,0,0,0-4.77,1.06,9.54,9.54,0,0,0-4.89,5.66,11.78,11.78,0,0,0-.51,2.3Z'/%3e%3cpath%20class='cls-4'%20d='M193,81.64a4.49,4.49,0,0,1-4.51-4.55V27.28A4.58,4.58,0,0,1,189.84,24a4.48,4.48,0,0,1,3.28-1.36A4.36,4.36,0,0,1,196.35,24a4.46,4.46,0,0,1,1.31,3.31V77.09a4.34,4.34,0,0,1-1.35,3.2A4.67,4.67,0,0,1,193,81.64Z'/%3e%3cpath%20class='cls-4'%20d='M263.79,81.71a5.7,5.7,0,0,1-4.2-1.74,5.76,5.76,0,0,1-1.73-4.19V27.37a4.58,4.58,0,0,1,1.35-3.27A4.59,4.59,0,0,1,267,27.37V72.53h24a4.58,4.58,0,0,1,3.27,7.82A4.66,4.66,0,0,1,291,81.71Z'/%3e%3cpath%20class='cls-4'%20d='M424.48,81.74a4.71,4.71,0,0,1-2.71-.88,5.43,5.43,0,0,1-1-1l-.07-.09-12.41-17-5.41,5v9.44a4.31,4.31,0,0,1-1.36,3.19,4.66,4.66,0,0,1-3.3,1.36A4.29,4.29,0,0,1,395,80.42a4.36,4.36,0,0,1-1.32-3.23V27.37A4.58,4.58,0,0,1,395,24.1a4.52,4.52,0,0,1,6.58.12,4.54,4.54,0,0,1,1.24,3.15V56.31l17.72-16.38.05,0a4.8,4.8,0,0,1,2.94-1.11,4.4,4.4,0,0,1,3.27,1.2,4.57,4.57,0,0,1,1.2,3.27,4.44,4.44,0,0,1-.77,2.33,7.45,7.45,0,0,1-1.43,1.65l-11,9.64,13.34,17.68a5,5,0,0,1,1,2.71,4.12,4.12,0,0,1-1.36,3.24A4.64,4.64,0,0,1,424.48,81.74Z'/%3e%3cpath%20class='cls-4'%20d='M317.93,81.76a21.5,21.5,0,1,1,21.17-21.5A21.37,21.37,0,0,1,317.93,81.76Zm0-34.1a12.61,12.61,0,1,0,12.42,12.6A12.52,12.52,0,0,0,317.93,47.66Z'/%3e%3cpath%20class='cls-4'%20d='M212.18,101.22a4.12,4.12,0,0,1-3.05-1.26,4.17,4.17,0,0,1-1.26-3.1V43.34a4.37,4.37,0,0,1,1.3-3.14,4.26,4.26,0,0,1,3.13-1.3,4.19,4.19,0,0,1,3.1,1.26,4.32,4.32,0,0,1,1.26,3.16,20.77,20.77,0,0,1,13-4.54,21.51,21.51,0,0,1,0,43,20.51,20.51,0,0,1-13-4.57V96.86a4.15,4.15,0,0,1-1.3,3.06A4.5,4.5,0,0,1,212.18,101.22Zm17.43-53.63c-6.23,0-12.93,4.11-12.93,12.72a12.73,12.73,0,0,0,25.46,0A12.71,12.71,0,0,0,229.61,47.59Z'/%3e%3cpath%20class='cls-4'%20d='M365.76,81.76a21.5,21.5,0,1,1,21.18-21.5A21.37,21.37,0,0,1,365.76,81.76Zm0-34.1a12.61,12.61,0,1,0,12.42,12.6A12.52,12.52,0,0,0,365.76,47.66Z'/%3e%3c/svg%3e)