
【Decodo】Proxy Configuration
A cloud phone provides an independent Android device environment, while a proxy determines the device’s network location and external IP address.
By connecting a Decodo SOCKS5 proxy to a DuoPlus cloud phone, you can create a cloud device with a network environment from a selected country or region.
1. Decodo Proxy Introduction
1.1 Product Introduction
Decodo, formerly known as Smartproxy, is a proxy and web data infrastructure provider offering residential, static residential, mobile, and data center proxies.
Its proxy network covers more than 195 locations and supports different targeting and session options depending on the selected product.
Decodo proxies support various business scenarios, including multi-account management, social media operations, e-commerce, market research, SEO monitoring, ad verification, price tracking, web data collection, and brand protection.
When Decodo is used with DuoPlus, the proxy is configured at the cloud phone level. This allows different DuoPlus cloud phones to use separate proxy environments.
1.2 Differences Between Decodo Proxy Types
Decodo currently provides several main proxy types.
Residential Proxy: Backed by IP addresses from real residential networks, this type offers broad location coverage and supports both rotating and sticky sessions. It is suitable for flexible regional access, short-term account operations, market research, and other scenarios that require residential IPs.
Static Residential Proxy: Designed for longer-term use, this proxy combines residential IP attributes with a stable IP address. It is a better choice for account registration, long-term account management, social media operations, and e-commerce activities that require a consistent network environment.
Mobile Proxy: Connected through mobile carrier networks, this type provides an IP environment similar to that of a real mobile device. It is commonly used for mobile app testing, mobile ad verification, social media operations, and other mobile-focused tasks.
Data Center Proxy: Known for faster speeds and lower costs, this proxy runs on data center servers rather than residential or mobile networks. It works well for general browsing, data collection, SEO monitoring, price tracking, and tasks that do not require residential IP attributes.
2. Decodo Proxy Purchase and Configuration Process
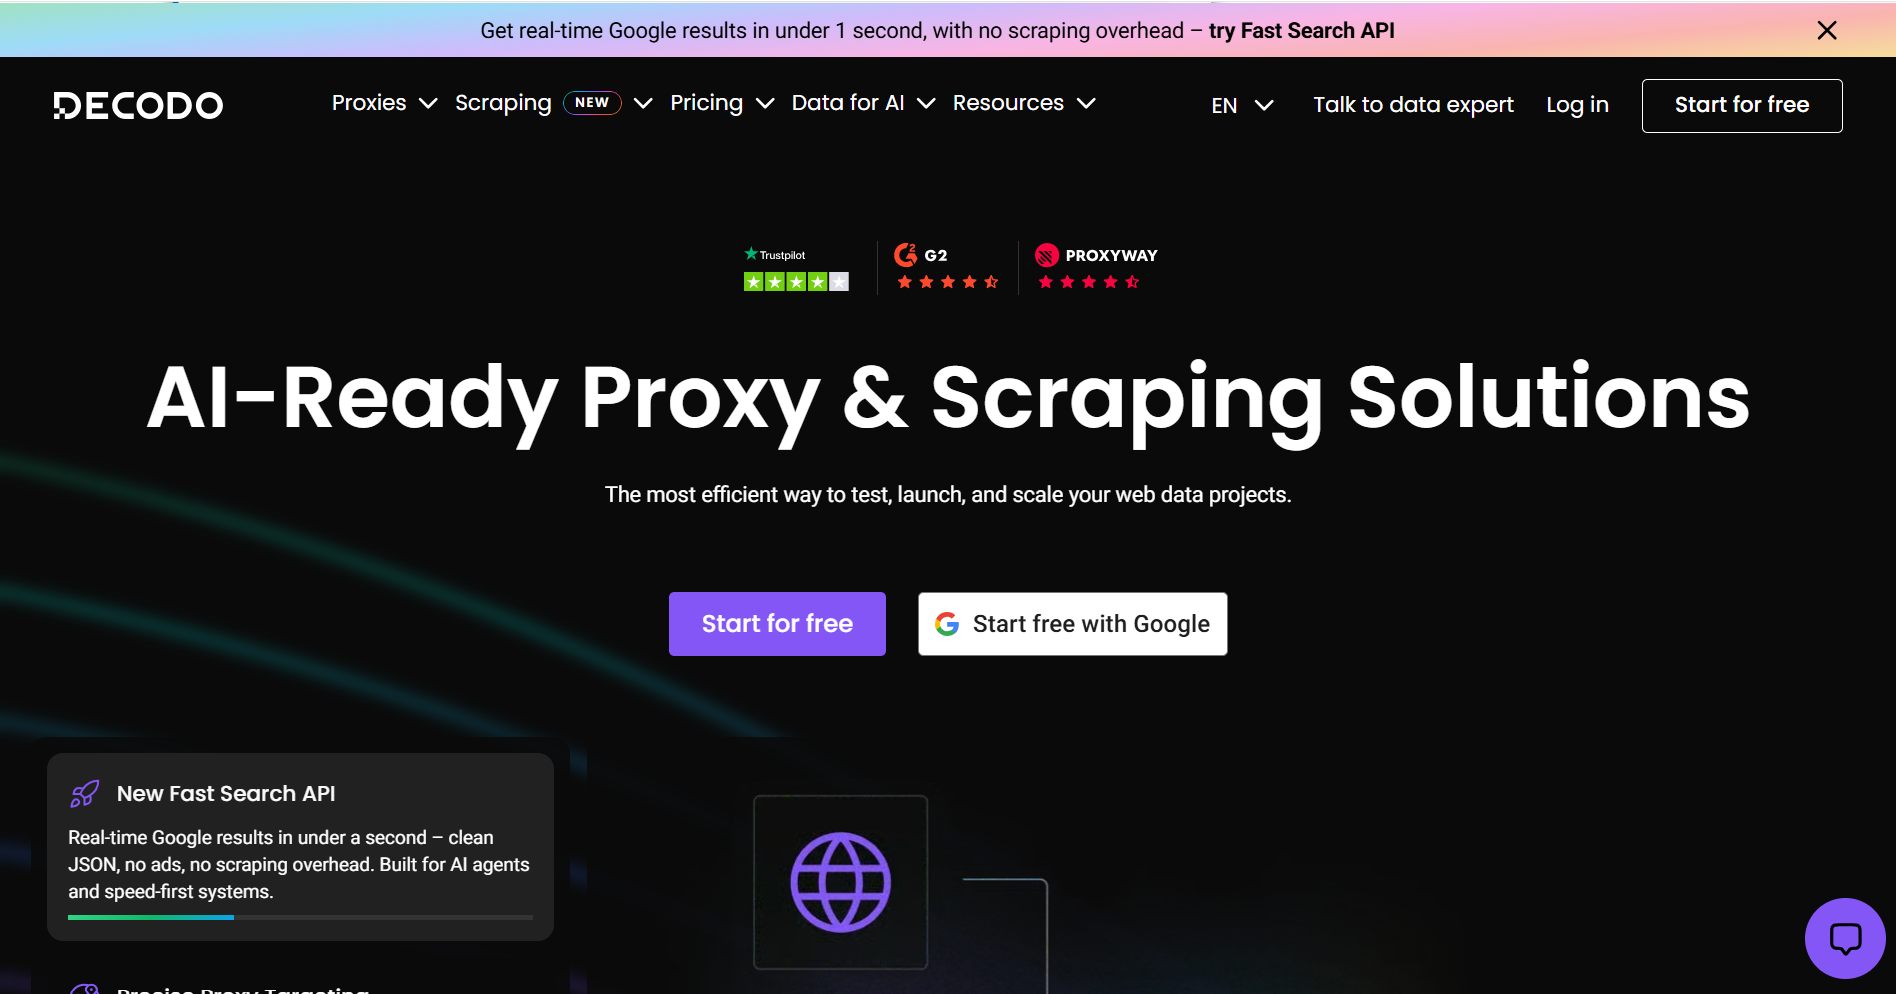
2.1 Register and Log In to Your Decodo Account
Visit the Decodo official website and register an account:
After completing the registration, log in to the Decodo dashboard.
From the dashboard, users can purchase proxy plans, create proxy users, choose locations and session types, and generate the proxy information required for DuoPlus.
2.2 Purchase and Extract Proxies from Decodo
Decodo currently provides two main Static Residential pricing models:
- Pay/GB
- Pay/IP
The proxy setup process is generally the same regardless of the selected plan.
Choose a plan according to your required traffic, number of IPs, and usage period, then complete the purchase.
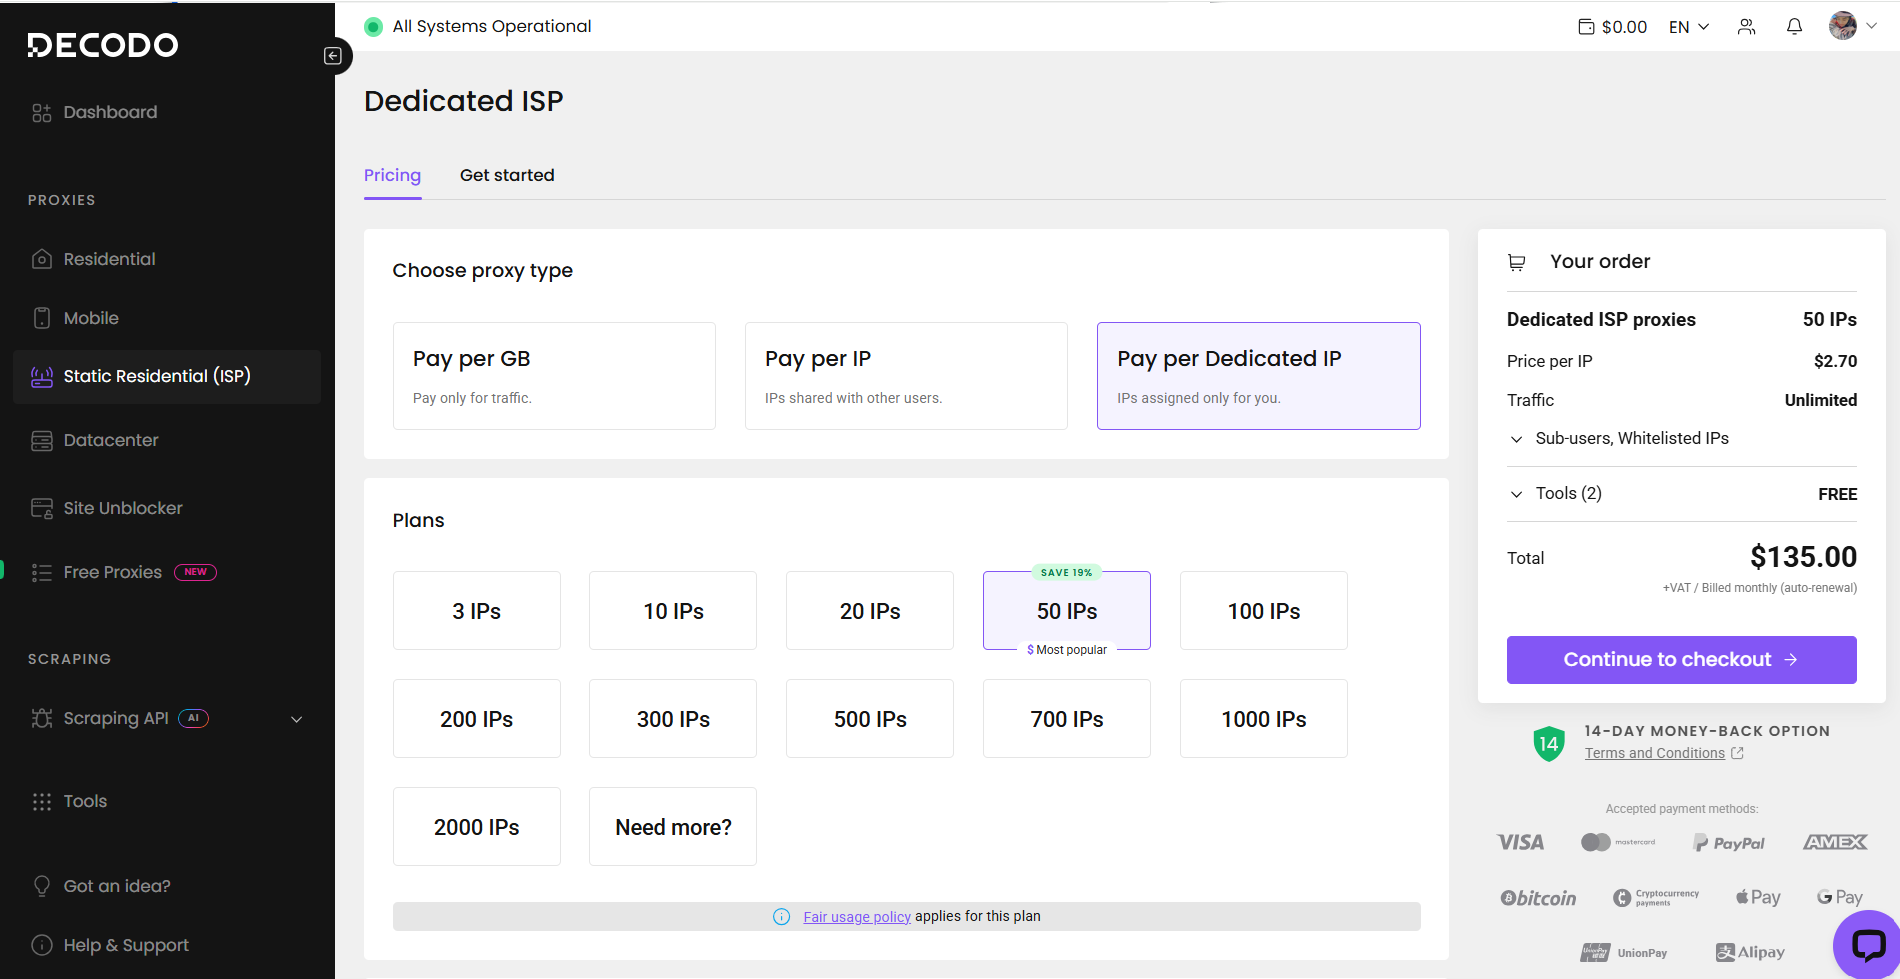
Select the proxy plan according to your requirements, including:
- Country or region
- Number of IPs or traffic volume
- Subscription period
- Dedicated or shared access, when available
Complete the purchase using the payment options displayed in the Decodo dashboard.
2.3 Configure the Decodo ISP Proxy Authentication
After purchasing the plan, open the selected Static Residential product and enter the Proxy Setup tab.
Decodo automatically creates an initial proxy user with a username and password.
You can:
- Copy the automatically generated password
- Generate a new password
- Create an additional proxy user
- Set a traffic limit for a user
- Remove an existing user
Decodo also supports IP whitelisting. However, for DuoPlus Cloud Phone, username-and-password authentication is generally more convenient because the cloud phone runs on a remote server.
2.4 Generate the Proxy Endpoint
Return to the Proxy Setup tab and select the proxy user you want to use.
Then configure the following settings:
Select the Proxy Location
Choose the required country or proxy location.
For Pay/GB proxies, selecting Random allows Decodo to choose an IP randomly from its available ISP proxy pools.
For shared or dedicated Pay/IP proxies, use the Direct IP dropdown to select one of the IP addresses you purchased.
Select the Session Type
Decodo provides two session types:
- Static Session: The proxy IP remains the same until you manually change it.
- Rotating Session: The proxy IP changes with each new connection request.
For DuoPlus cloud phones, a static session is recommended when the same cloud phone will be used to manage an account over a longer period.
Select the Proxy Protocol
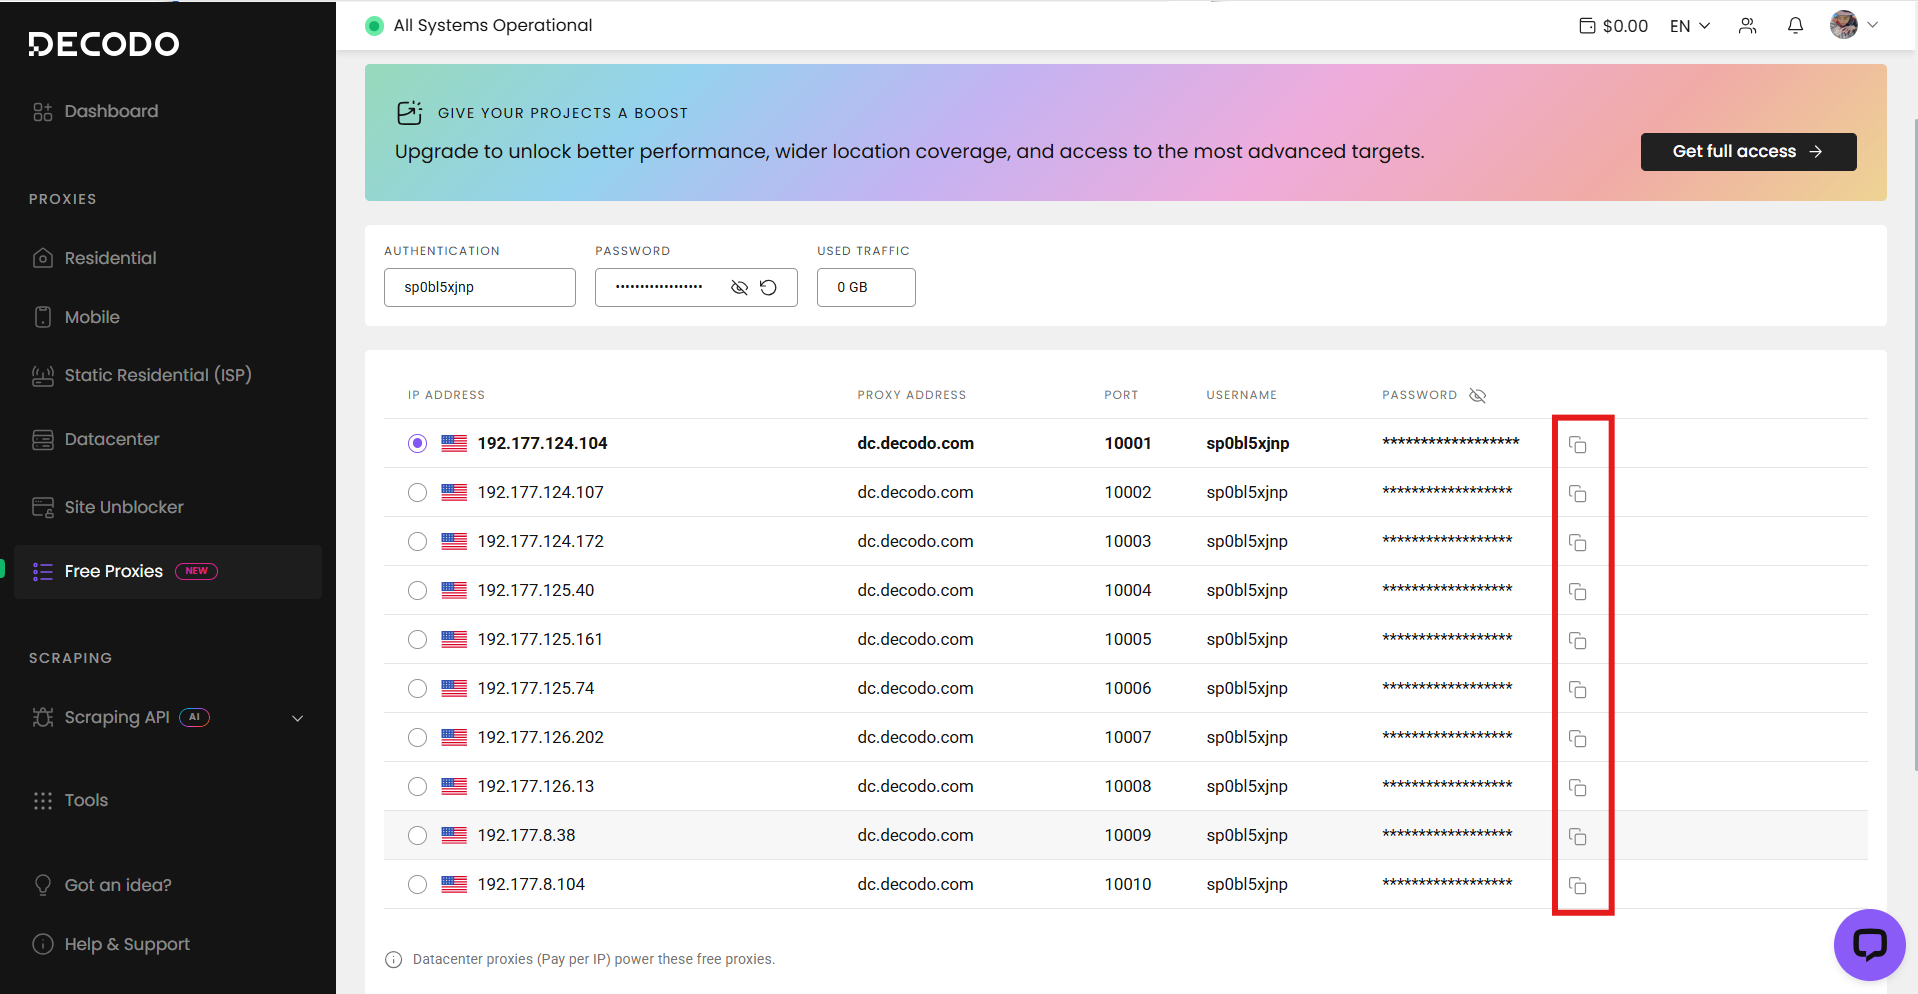
DuoPlus currently supports all three proxy protocols-SOCKS5, HTTP and HTTPS. Make sure the protocol selected in DuoPlus matches the protocol generated in Decodo. After completing the proxy settings, Decodo will generate the proxy endpoints.
You can copy an individual proxy endpoint or download the entire proxy list. Keep this information ready for the DuoPlus configuration.
3. DuoPlus Cloud Phone Configuration
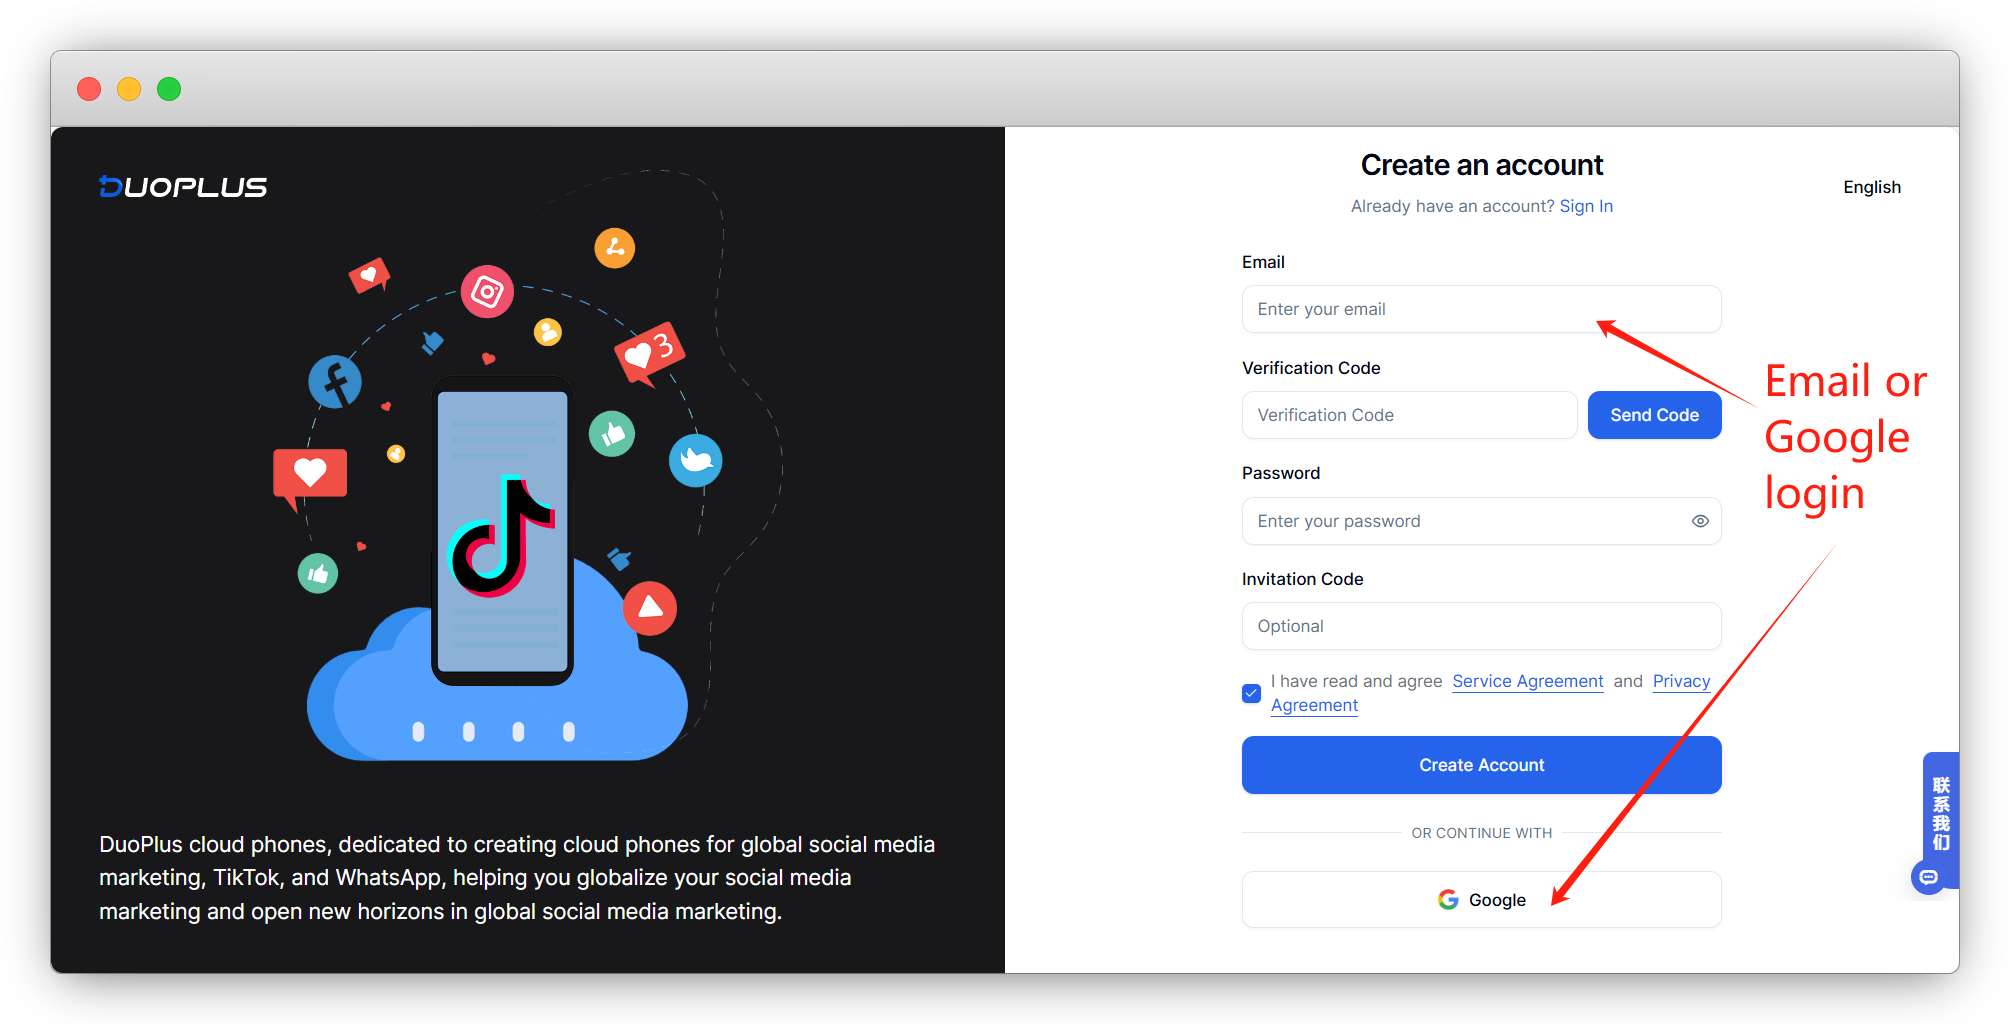
3.1 DuoPlus Registration and Login
Log in to the DuoPlus official website and register: https://www.duoplus.net/
3.2 Purchasing a Cloud Phone
After registering an account, enter the DuoPlus management interface and start creating a cloud phone by clicking "Experience Now".
Enter the cloud phone purchase interface and choose the number and duration of cloud phones you wish to purchase according to your needs.
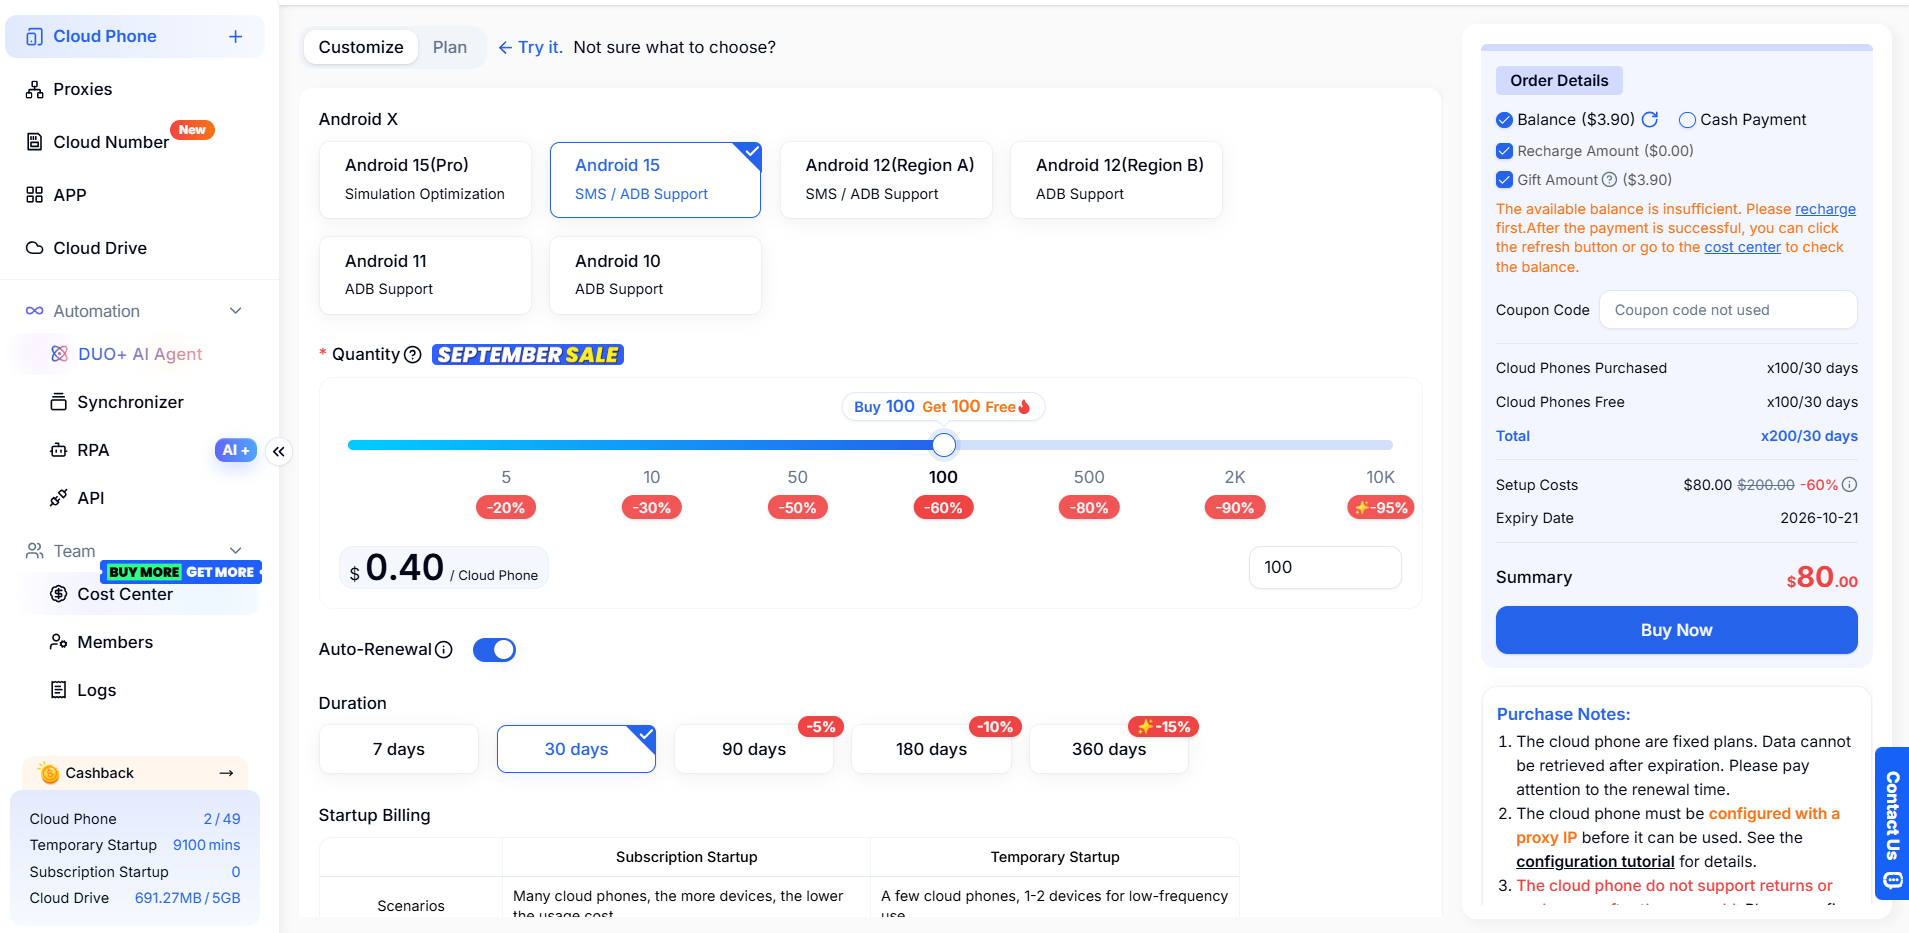
The payment methods for cloud phones are divided into balance payment and cash payment.
-
Balance payment: The purchase cost will be deducted from your balance without any payment fees. A handling fee will be charged if the single recharge amount is less than 100, and temporary computing power startup costs will also be deducted from the balance.
-
Cash payment: Currently supports WeChat, Alipay, and PayPal payments. A handling fee will be charged if the single payment amount is less than 100.
After selecting the purchase duration and payment method for the cloud phone, click "Buy Now" in the bottom right corner.
3.3 Configuring Decodo for Cloud Phone
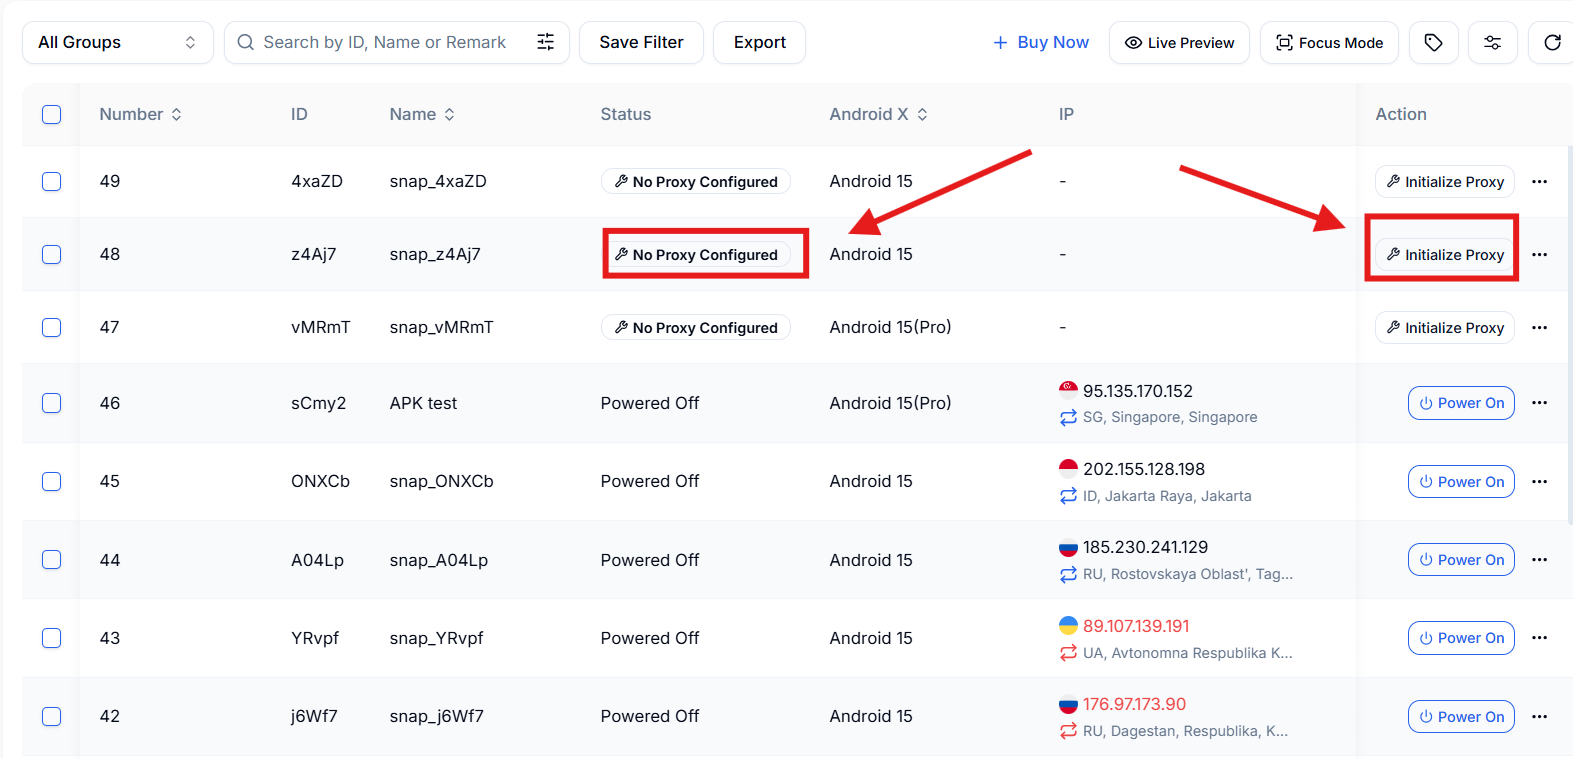
After purchasing the cloud phone, you will automatically be redirected to the proxy configuration page (if not redirected, you can click into the proxy configuration page from the "Cloud Phone" list).
-
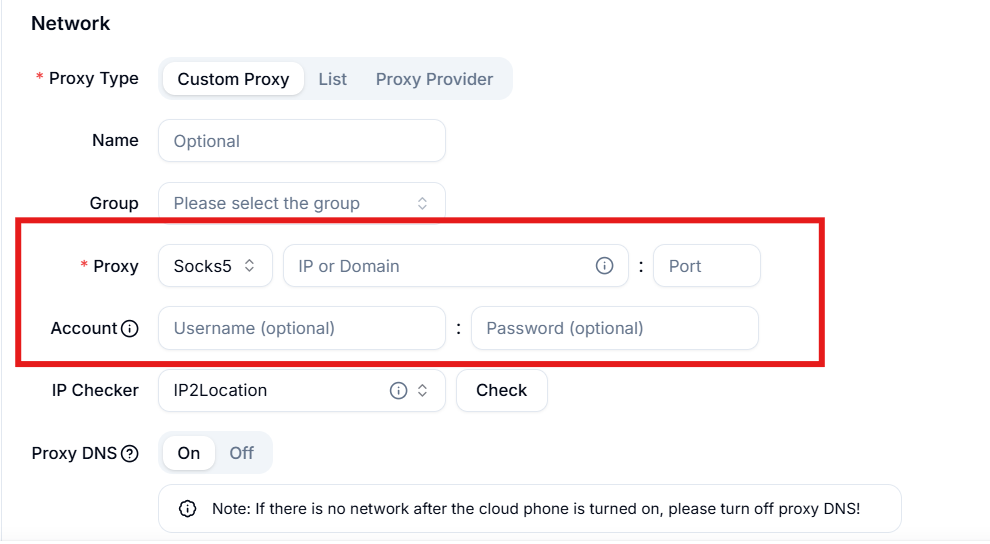
Click on [Custom Proxy] in the proxy configuration interface.
-
Open Decodo, find the purchased IP proxy information, and copy and paste the domain and port into the "IP or Domain" and "Port" fields; then open the proxy user page, create your proxy user account and password, and copy and paste them into the "Proxy Account and Password" field.
-
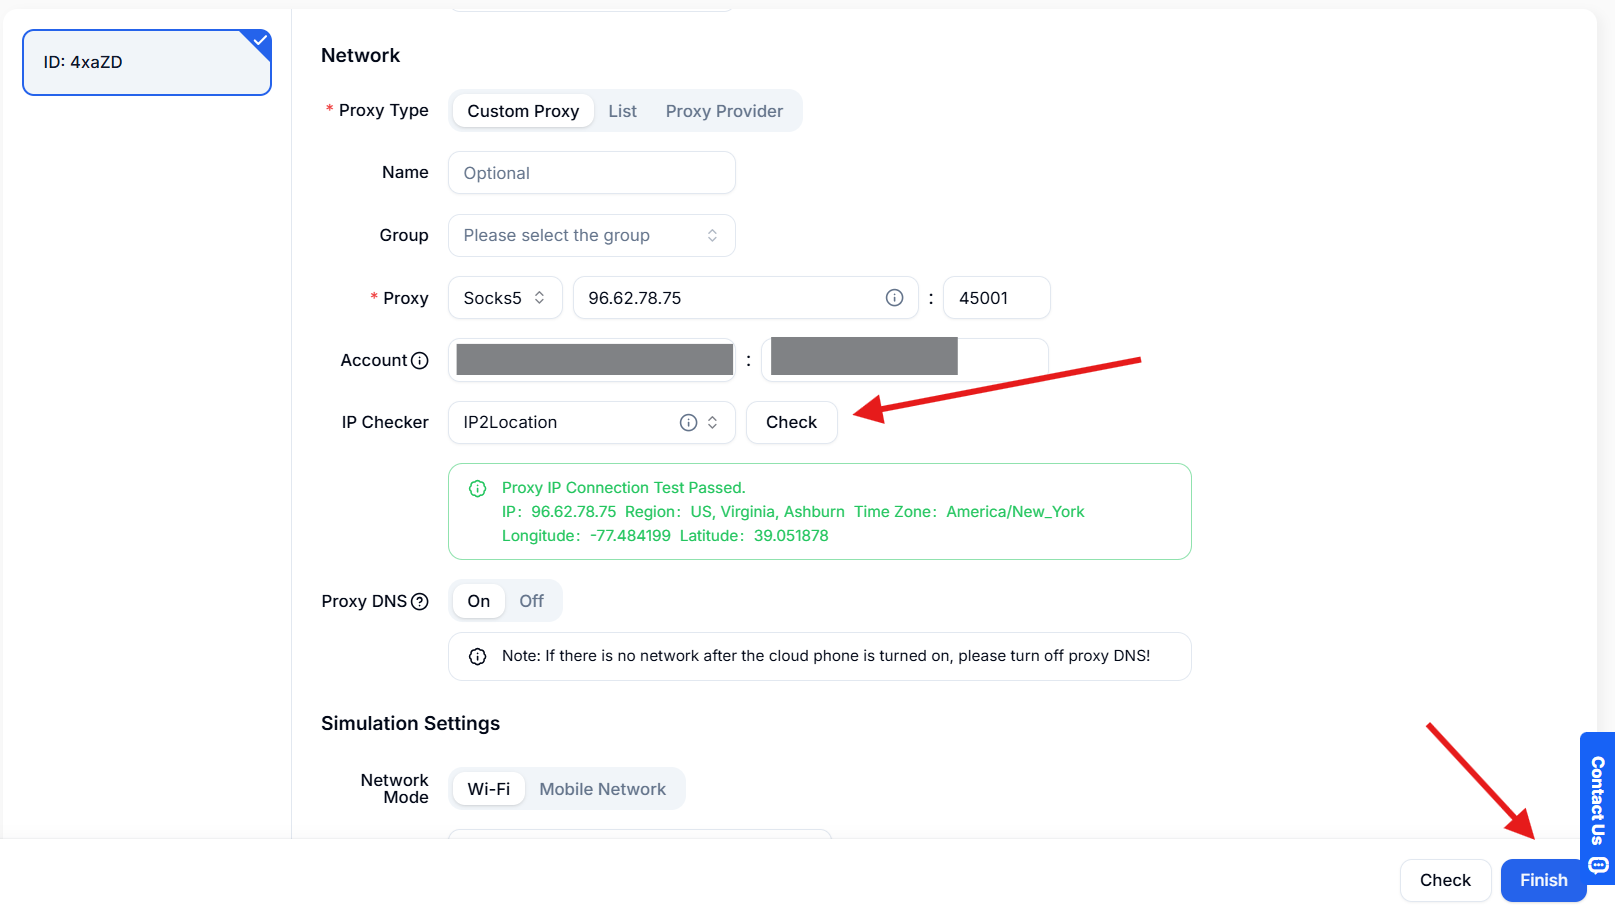
Click on "check", After the proxy test is successful, click "Finish" to finish creating a cloud phone.
-
If the proxy test fails, please contact customer service for troubleshooting.
4. Using DuoPlus Cloud Phone
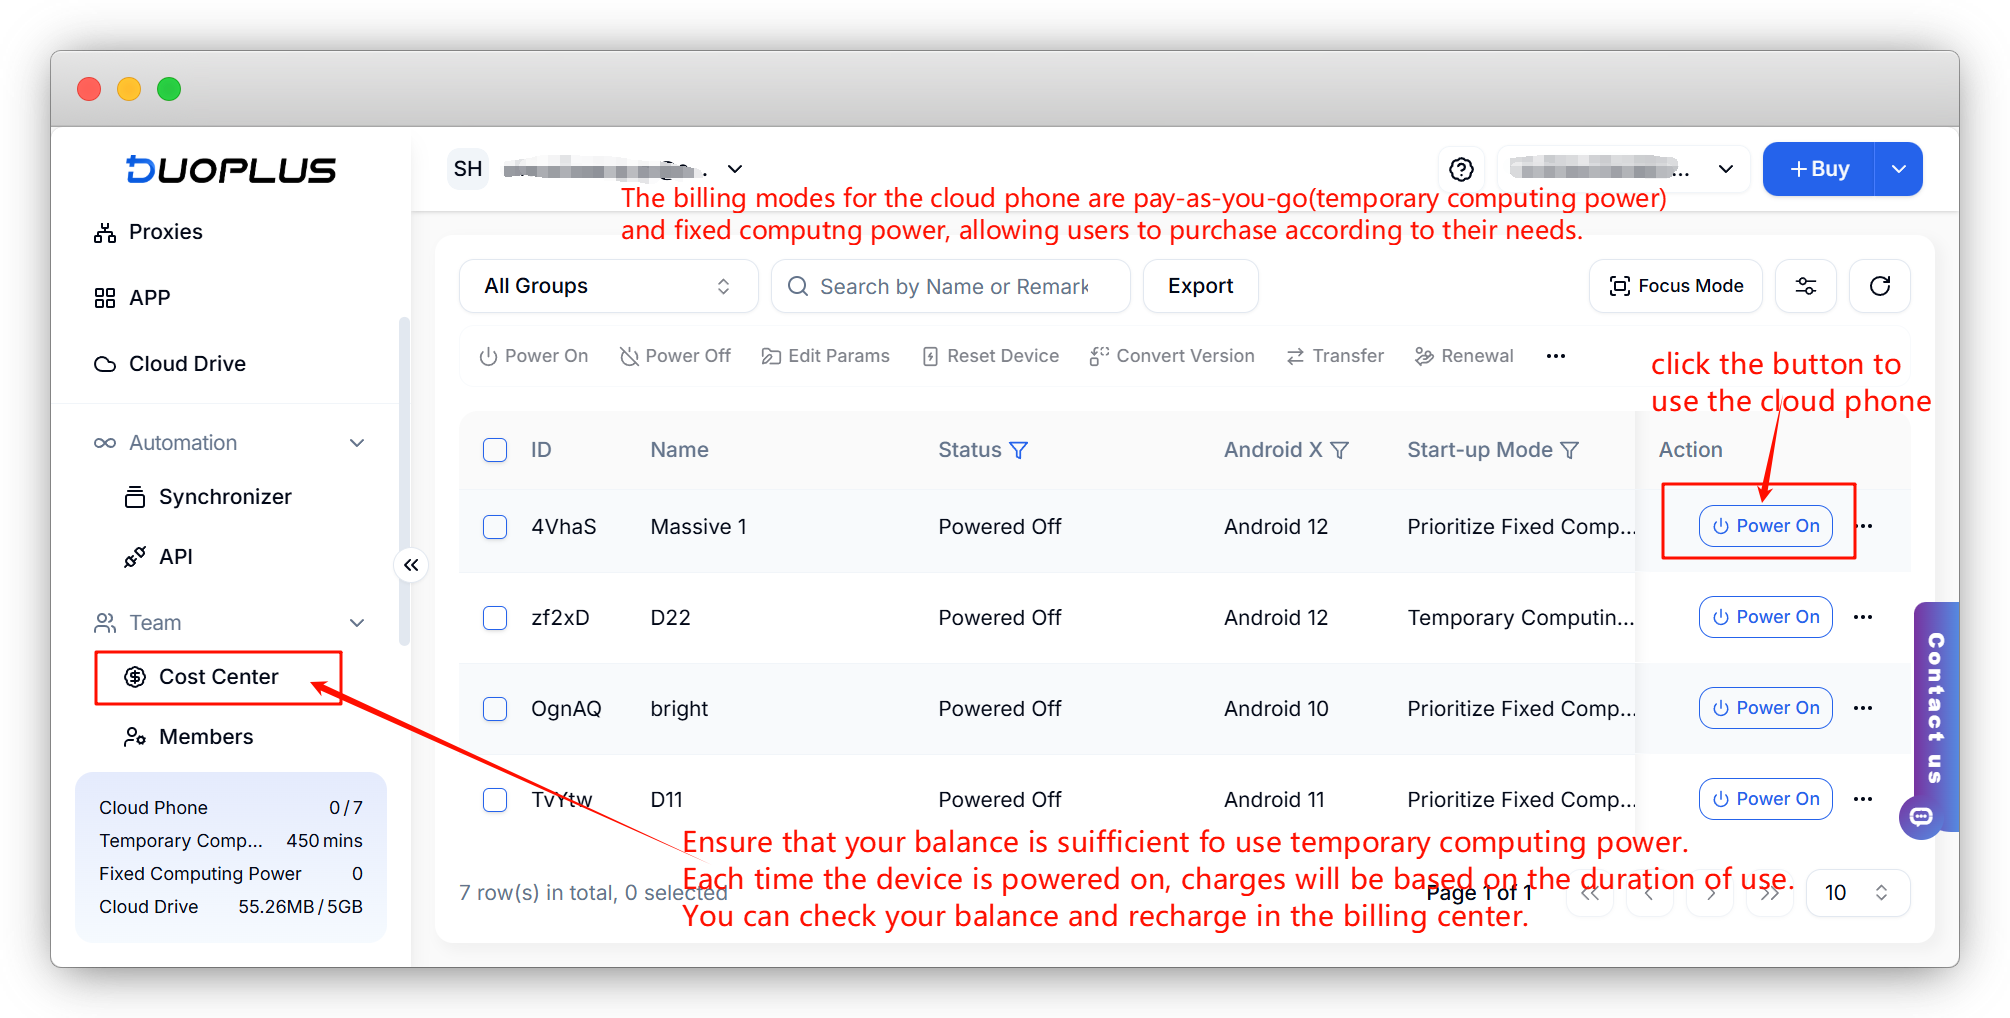
Once the cloud phone is created, you can start using it normally. Users can choose a billing model according to their needs, either pay by the hour (if there is sufficient balance) or purchase fixed computing power (ready to start anytime). Click on "Connect" to start the cloud phone.
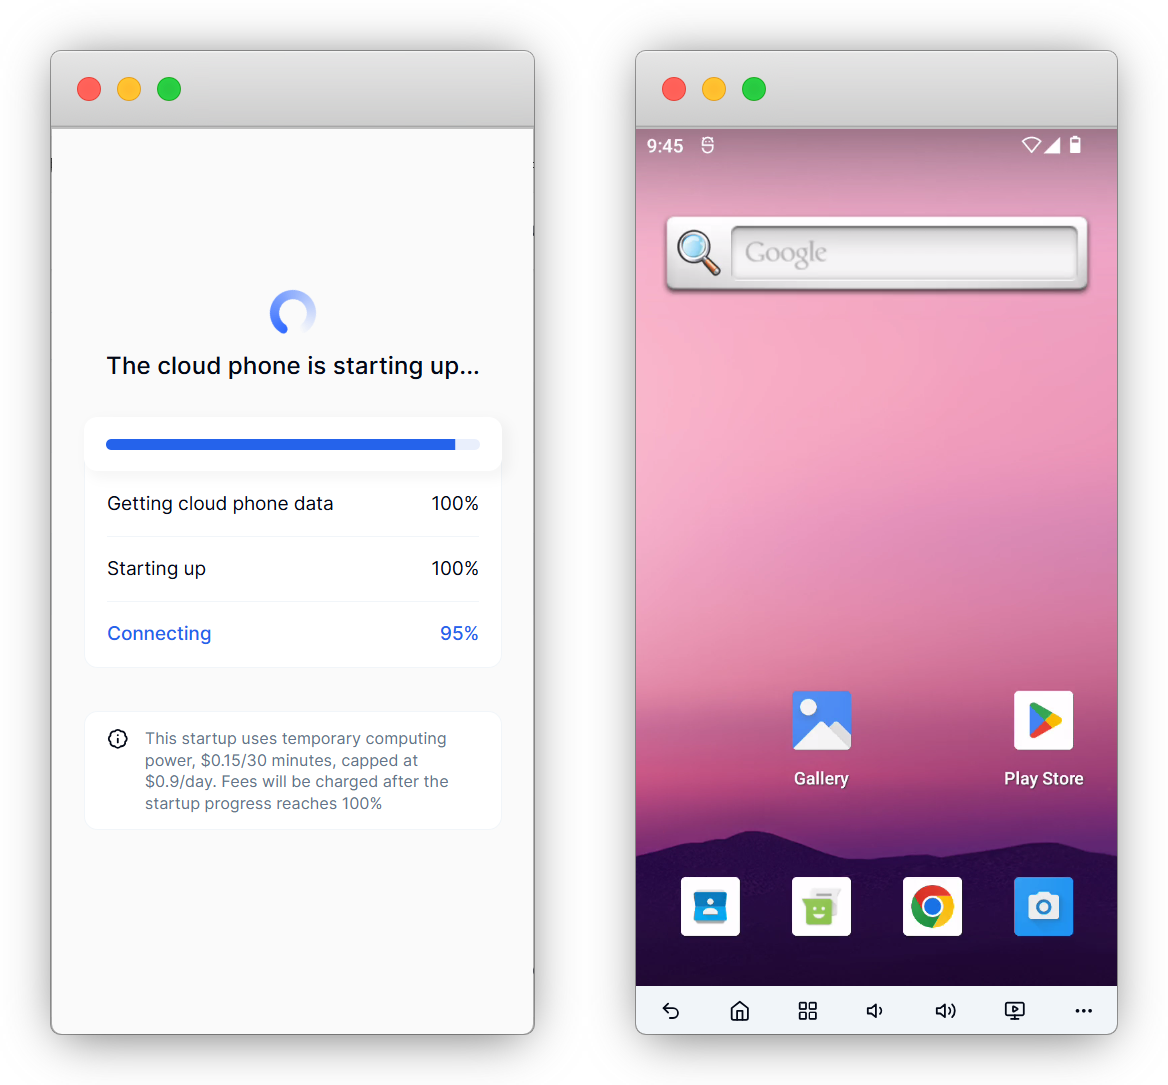
After clicking "Connect," wait a few seconds to complete the startup, and a brand new cloud phone will be generated. The cloud phone supports various functions: quality adjustment, batch file uploads, one-click new machine, parameter modification, etc. Please refer to the internal functionality of the cloud phone for operations.
;}.cls-2{fill:%230868f7;}.cls-3{fill:url(%23未命名的渐变_44);}.cls-4{fill:%23333;}%3c/style%3e%3clinearGradient%20id='未命名的渐变_8'%20x1='33.73'%20y1='100.61'%20x2='-0.03'%20y2='-1.06'%20gradientUnits='userSpaceOnUse'%3e%3cstop%20offset='0'%20stop-color='%237ae9fb'/%3e%3cstop%20offset='0.67'%20stop-color='%232b90f8'/%3e%3cstop%20offset='1'%20stop-color='%230868f7'/%3e%3c/linearGradient%3e%3clinearGradient%20id='未命名的渐变_44'%20x1='27.86'%20y1='18.67'%20x2='68.36'%20y2='22.22'%20gradientUnits='userSpaceOnUse'%3e%3cstop%20offset='0'%20stop-color='%235ac7f2'/%3e%3cstop%20offset='1'%20stop-color='%230868f7'/%3e%3c/linearGradient%3e%3c/defs%3e%3cpath%20class='cls-1'%20d='M29,28.74V81.91l-9.51-3.68v0L8.52,74A7.17,7.17,0,0,1,4,67.32V24.54A3.76,3.76,0,0,1,9.08,21Z'/%3e%3cpath%20class='cls-2'%20d='M68.09,78.07a13.15,13.15,0,0,1-17.9,12.06L29,81.91h0V28.74L50.19,37A13.17,13.17,0,0,0,68.08,25.3h0Z'/%3e%3cpath%20class='cls-3'%20d='M68.08,25.3a13.19,13.19,0,0,1-6.73,10.87A13.09,13.09,0,0,1,50.19,37L29,28.74V6A3.76,3.76,0,0,1,34.1,2.52l25.59,9.91A13.22,13.22,0,0,1,68.08,25.3Z'/%3e%3cpath%20class='cls-4'%20d='M129.06,81.76a4.33,4.33,0,0,1-3.19-1.31,4.4,4.4,0,0,1-1.31-3.24V56.86H97.65V77.21a4.36,4.36,0,0,1-1.35,3.2A4.68,4.68,0,0,1,93,81.76a4.32,4.32,0,0,1-3.19-1.31,4.37,4.37,0,0,1-1.32-3.24V27.27A4.58,4.58,0,0,1,89.83,24a4.59,4.59,0,0,1,7.82,3.27V48.15h26.91V27.27A4.58,4.58,0,0,1,125.91,24a4.59,4.59,0,0,1,7.82,3.27V77.21a4.37,4.37,0,0,1-1.36,3.2A4.65,4.65,0,0,1,129.06,81.76Z'/%3e%3cpath%20class='cls-4'%20d='M163.77,81.66c-6.57,0-11.76-1.92-15.44-5.7s-5.54-9.07-5.54-15.74a26.76,26.76,0,0,1,2.09-10.43,17.72,17.72,0,0,1,6.67-8.06,19.15,19.15,0,0,1,10.68-2.95,19,19,0,0,1,10.46,2.8,18.7,18.7,0,0,1,6.55,7.36,22.53,22.53,0,0,1,2.36,10.28A4.51,4.51,0,0,1,177,63.77H152.23a10.8,10.8,0,0,0,3.49,6.65c2,1.68,4.88,2.52,8.66,2.52a22.25,22.25,0,0,0,7.54-1.21c.74-.3,1.55-.67,2.37-1.07a3.75,3.75,0,0,1,1.84-.4,4.09,4.09,0,0,1,3,1.15,4,4,0,0,1,1.12,3,4.38,4.38,0,0,1-2.58,3.82,32.34,32.34,0,0,1-6.36,2.61A28.67,28.67,0,0,1,163.77,81.66ZM172.4,55.9a9.72,9.72,0,0,0-1.63-4.56A9.9,9.9,0,0,0,167,48a10.38,10.38,0,0,0-4.64-1.14,12,12,0,0,0-4.77,1.06,9.54,9.54,0,0,0-4.89,5.66,11.78,11.78,0,0,0-.51,2.3Z'/%3e%3cpath%20class='cls-4'%20d='M193,81.64a4.49,4.49,0,0,1-4.51-4.55V27.28A4.58,4.58,0,0,1,189.84,24a4.48,4.48,0,0,1,3.28-1.36A4.36,4.36,0,0,1,196.35,24a4.46,4.46,0,0,1,1.31,3.31V77.09a4.34,4.34,0,0,1-1.35,3.2A4.67,4.67,0,0,1,193,81.64Z'/%3e%3cpath%20class='cls-4'%20d='M263.79,81.71a5.7,5.7,0,0,1-4.2-1.74,5.76,5.76,0,0,1-1.73-4.19V27.37a4.58,4.58,0,0,1,1.35-3.27A4.59,4.59,0,0,1,267,27.37V72.53h24a4.58,4.58,0,0,1,3.27,7.82A4.66,4.66,0,0,1,291,81.71Z'/%3e%3cpath%20class='cls-4'%20d='M424.48,81.74a4.71,4.71,0,0,1-2.71-.88,5.43,5.43,0,0,1-1-1l-.07-.09-12.41-17-5.41,5v9.44a4.31,4.31,0,0,1-1.36,3.19,4.66,4.66,0,0,1-3.3,1.36A4.29,4.29,0,0,1,395,80.42a4.36,4.36,0,0,1-1.32-3.23V27.37A4.58,4.58,0,0,1,395,24.1a4.52,4.52,0,0,1,6.58.12,4.54,4.54,0,0,1,1.24,3.15V56.31l17.72-16.38.05,0a4.8,4.8,0,0,1,2.94-1.11,4.4,4.4,0,0,1,3.27,1.2,4.57,4.57,0,0,1,1.2,3.27,4.44,4.44,0,0,1-.77,2.33,7.45,7.45,0,0,1-1.43,1.65l-11,9.64,13.34,17.68a5,5,0,0,1,1,2.71,4.12,4.12,0,0,1-1.36,3.24A4.64,4.64,0,0,1,424.48,81.74Z'/%3e%3cpath%20class='cls-4'%20d='M317.93,81.76a21.5,21.5,0,1,1,21.17-21.5A21.37,21.37,0,0,1,317.93,81.76Zm0-34.1a12.61,12.61,0,1,0,12.42,12.6A12.52,12.52,0,0,0,317.93,47.66Z'/%3e%3cpath%20class='cls-4'%20d='M212.18,101.22a4.12,4.12,0,0,1-3.05-1.26,4.17,4.17,0,0,1-1.26-3.1V43.34a4.37,4.37,0,0,1,1.3-3.14,4.26,4.26,0,0,1,3.13-1.3,4.19,4.19,0,0,1,3.1,1.26,4.32,4.32,0,0,1,1.26,3.16,20.77,20.77,0,0,1,13-4.54,21.51,21.51,0,0,1,0,43,20.51,20.51,0,0,1-13-4.57V96.86a4.15,4.15,0,0,1-1.3,3.06A4.5,4.5,0,0,1,212.18,101.22Zm17.43-53.63c-6.23,0-12.93,4.11-12.93,12.72a12.73,12.73,0,0,0,25.46,0A12.71,12.71,0,0,0,229.61,47.59Z'/%3e%3cpath%20class='cls-4'%20d='M365.76,81.76a21.5,21.5,0,1,1,21.18-21.5A21.37,21.37,0,0,1,365.76,81.76Zm0-34.1a12.61,12.61,0,1,0,12.42,12.6A12.52,12.52,0,0,0,365.76,47.66Z'/%3e%3c/svg%3e)